It is currently 20 Apr 2024 15:02

All times are UTC+01:00


Post new topic  Reply to topic  [ 12 posts ] 
Author Message
PostPosted: 26 Jan 2014 15:07 
Offline
proff. patpending
User avatar

Joined: 06 May 2009 20:20
Posts: 14705
Current ride: Victoria Sponge
Location: Bristol - Gateway to all things good
The How To contains a thread on how to overhaul your tensioner wheel bearing and 
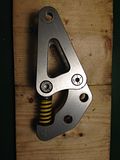
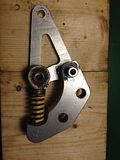
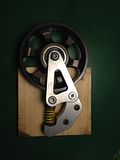
one showing how to fit a Free Spirits Tensioner, however the Free Spirits Tensioner itself can suffer from wear resulting in uneven belt support. You can see if yours is worn by attempting to move the fork from side to side. If you attempt to move the tensioner wheel from side to side, you may pick up worn wheel bearings as well as a worn pivot bearing. It is important that you don't just tighten the pivot shaft screws up as this just results in excessive wear on the thrust faces of the fork which may temporarily address rotational movement but not radial.

Edd commissioned a kit to overhaul these:

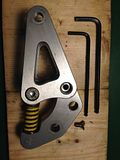
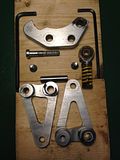
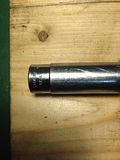
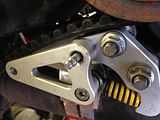
1. Remove the tensioner from the bike
Image

2. Remove the tensioner wheel
Image

3. Using a pair of allen keys, remove the pivot screws either side of the pivot shaft..
Image

You may be lucky to have unmolested non-security countersunk screws, however Free Spirits have applied a countersink to the socket head
Image

The way around this is to find a 1/4" bit the correct size allen bit and press the screw (in the fork) against the bit in a vice, then use a 1/4" open ended spanner to unscrew the screw, opening the vice a little to allow movement. Free Spirits have also used security screws...
Image
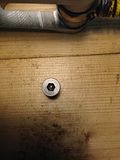
...with a pin in the middle of the socket in the screw head, you will need a security bit to remove these.

4. ...and the rose joint screw
Image

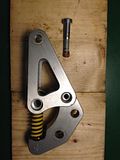
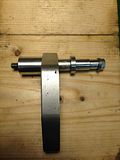
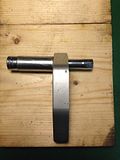
5. Remove the right hand fork
Image

6. Then the left fork and pivot shaft
Image

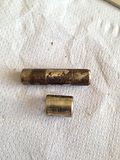
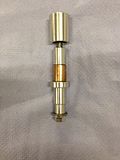
7. Knock the roll pin through and extract the bush from the centre section using the special bush removal tool
Image Image Image Image Image

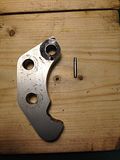
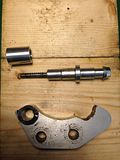
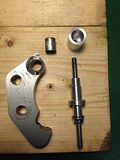
or carefully selected 1/4" drive sockets
Image Image Image

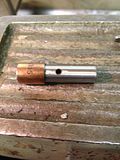
8. Check out the shaft and bush, all the worn ones I have seen have suffered from corrosion which has accelerated wear.
Image

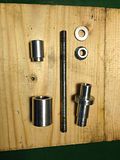
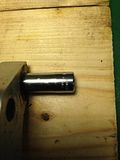
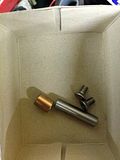
The kit contains a new bush and shaft, with a grease port, new screws and a new roll pin...
Image Image

9. Clean the centre section and prepare the new bush on the bush installation tool before pressing it home
Image [Picture to follow]

10. Tap in the new roll pin
[Picture to follow]

11. Reassemble however apply loctite screwlock to the inner pivot shaft screw...
Image
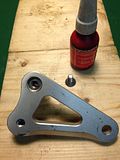
...and position the hole to face upwards. Liberally apply grease to the inside of the bush.

Image Image

Grease can be applied using the extended grease nipple after removing the outer (or right hand) pivot shaft screw.
Image

_________________
08 Specialized Langster


Top
PostPosted: 13 Feb 2014 11:27 
Offline
User avatar

Joined: 06 May 2009 16:40
Posts: 855
Current ride: 06 12R
Location: near the lions
Great how to :)

My tensioner was fitted in 2008 and has been, pretty much, neglected since.

Here's my sorry looking pin,

Image

The gnarling on the lhs is from a hefty pinch in the vice as the pin was well seized in the fork.

I used the deep socket method to extract the bush from the centre piece.

I'll be swapping the bearings in the tensioner wheel while I'm at it.

:sun:

_________________
Partial to a bit of both


Top
PostPosted: 13 Feb 2014 12:22 
Offline
proff. patpending
User avatar

Joined: 06 May 2009 20:20
Posts: 14705
Current ride: Victoria Sponge
Location: Bristol - Gateway to all things good
Nice work...

_________________
08 Specialized Langster


Top
PostPosted: 20 Mar 2014 07:36 
Offline
proff. patpending
User avatar

Joined: 06 May 2009 20:20
Posts: 14705
Current ride: Victoria Sponge
Location: Bristol - Gateway to all things good
Grease nipple pic added to original thread...

Image

Mint :!:

_________________
08 Specialized Langster


Top
PostPosted: 19 May 2014 20:31 
Offline

Joined: 09 Apr 2014 22:27
Posts: 8
Current ride: XB12STT
Location: Kent
Nice write up....

I recently refurbished my long neglected tensioner. I polished and anodised it and blasted and repainted the spring. I replaced the rod end as the spherical bearing was completely shot.
Just need to replace the countersunk screws now!

http://s1299.photobucket.com/user/Cails ... e.jpg.html


Top
PostPosted: 30 Jan 2016 21:43 
Offline
proff. patpending
User avatar

Joined: 06 May 2009 20:20
Posts: 14705
Current ride: Victoria Sponge
Location: Bristol - Gateway to all things good
Playing with XB bits tonight as I tidy up the garage discovering half finished stuff...

The FST is a funny thing. The design should be so that when the rose joint is fitted and the swing arm tightened, the swing arm should be free to rotate on the bearing. In fact when the rose joint is bolted in position the gap between the swing arm is 0.27mm too small for the static part to fit...
Image

Onto the mill to machine 0.27mm off...
Image

Also, on this particular FST, the hole for the pivot was 10.05mm, so a clearance fit on the pivot so the pivot shaft could rotate in the swing arm as well as the bearing...
Image

I got on the lathe and made a 10.06mm pivot shaft out of stainless. Drilled it though and added a grease port.
Image

One end is flanged, or top hatted, so it can only work its way out away from the engine. The original two screw assembly is not my favourite solution...
Image

I fitted a new bearing with my awesome FST bearing tool...
Image

Pushing it though. New one waits patiently...
Image

Old one out. New one in the departure lounge..
Image

And in it goes...
Image

Fitted
Image

Here's the outer side when fixed, note the grease nipple... I actually flipped the rose joint after the pic was taken to take the 'umbilical' out of harm's way...
Image Image

And the other side. Still a countersunk screw to stop the pivot shaft from exiting stage left...
Image

I *may* put some o-rings either side of the roase joint spherical bearing tomorrow to act as seals...

_________________
08 Specialized Langster


Top
PostPosted: 20 Mar 2016 08:26 
Offline
User avatar

Joined: 15 Dec 2011 16:32
Posts: 232
Current ride: xb12s lightning
Location: Nairn scotland
Nice one Pash, is the kit from f/s and where do you get the special tool :?: :?


Top
PostPosted: 20 Mar 2016 08:37 
Offline
proff. patpending
User avatar

Joined: 06 May 2009 20:20
Posts: 14705
Current ride: Victoria Sponge
Location: Bristol - Gateway to all things good
No, I made it all...

_________________
08 Specialized Langster


Top
PostPosted: 20 Mar 2016 09:26 
Offline
User avatar

Joined: 05 May 2009 20:00
Posts: 10872
Current ride: X1 2001
Location: southampton
:yup: well done Nick

_________________
Feros Ferio


Top
PostPosted: 20 Mar 2016 20:48 
Offline
User avatar

Joined: 15 Dec 2011 16:32
Posts: 232
Current ride: xb12s lightning
Location: Nairn scotland
pash wrote:
No, I made it all...

:yup: :worthy:


Top
PostPosted: 21 Mar 2016 22:24 
Offline

Joined: 02 Jul 2015 22:06
Posts: 117
Current ride: XB12XT
Location: East Midlands
I've been reading this with interest, my bike came with a FS tensioner fitted and I wondered if I needed to strip it for maintenance on a regular basis. i made sure it was all shimed correctly (using Pash's instructions) when I took it off to fit a new belt last year.

However I also found this tonight

http://www.buellxb.com/forum/showthread.php?30360-Free-spirits-belt-tensioner-failure

Which makes me wonder if I should refit the original tensioner, although the failure described in that thread, may have been caused by the tensioner not being fitted properly and binding on the exhaust?


Top
PostPosted: 22 Mar 2016 02:57 
Offline
proff. patpending
User avatar

Joined: 06 May 2009 20:20
Posts: 14705
Current ride: Victoria Sponge
Location: Bristol - Gateway to all things good
Oh dear. You don't really know if it was seized either...

_________________
08 Specialized Langster


Top
Display posts from previous:  Sort by  
Post new topic  Reply to topic  [ 12 posts ] 

All times are UTC+01:00


Who is online

Users browsing this forum: No registered users and 4 guests


You cannot post new topics in this forum
You cannot reply to topics in this forum
You cannot edit your posts in this forum
You cannot delete your posts in this forum
You cannot post attachments in this forum

Search for:
Jump to:  
cron
Powered by phpBB® Forum Software © phpBB Limited