It is currently 19 Apr 2024 14:39

All times are UTC+01:00


Post new topic  Reply to topic  [ 12 posts ] 
Author Message
PostPosted: 16 Mar 2015 20:42 
Offline
User avatar

Joined: 23 Jun 2009 12:55
Posts: 657
Current ride: S1W,Hype,HP2,R1200RS
Location: Preston, Lancs
Since I have had the S1W tank painted I thought I'd like it to last as long as possible and with ethanol content in fuel rising and only ESSO saying their Super Unleaded is free until the end of this year (then it too will have alcohol in), I have decided to coat the inside of the tank.

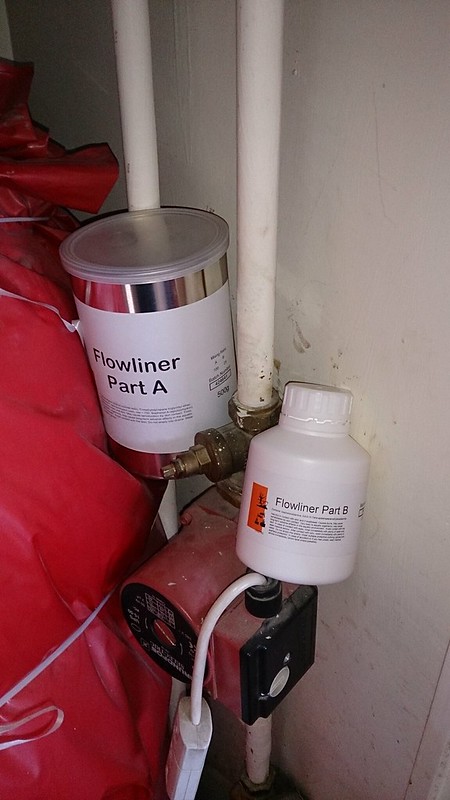
I bought some 'Flowliner' phenolic resin coating (http://www.flowliner.co.uk/) which I am told should be OK inside the plastic Manta tank.

Though I wish I had done it BEFORE the painting, a little surfing and the purchase of some extra cling film in the weekly shop means I can be reasonably certain not to F up the outside of the tank......now I just need to ensure that the inside is prepped well and that in the coating process the resin is not allowed to 'pool' to any depth as the curing gives off significant heat which apparently can bubble paint....something I want to avoid!

The instructions for Flowliner (and Caswell tank coating stuff) recommend roughing up the inside of the tank with 'dry wall' screws, tossed around inside the tank. This didn't seem to 'key' the surface particularly well. So I then attacked the inside with some 'scotchbrite'. Again not that much of a key.

A little more surfing shows that some places apparently 'media blast' inside a tank before coating. With the tank having a wide neck with the filler removed it is relatively easy to get inside with coarse emery. So I got about 60% of the inside before my arms were struggling. Fortunately Madam was able to get further in to reach the parts I couldn't.
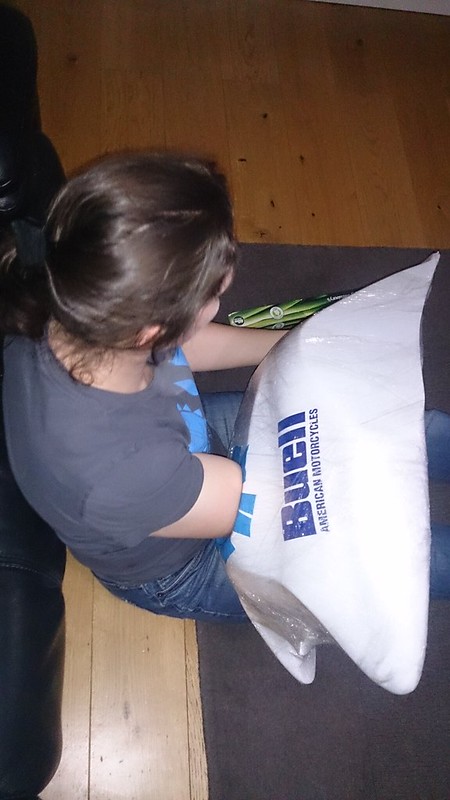
ImageDSC_0525 by jeznewsome, on Flickr

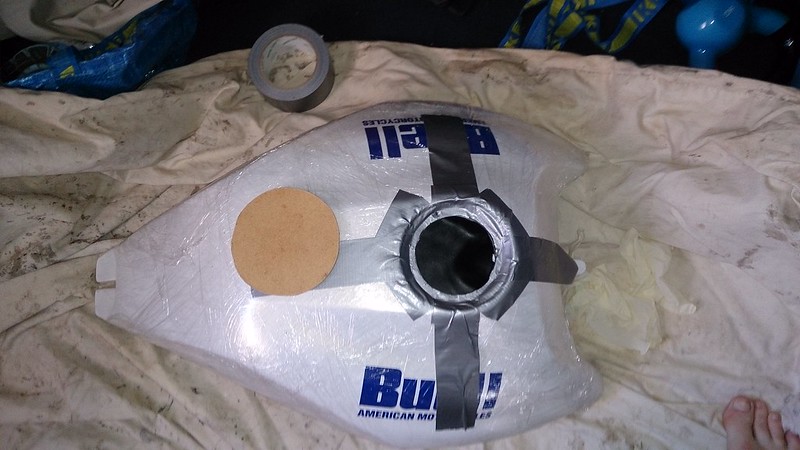
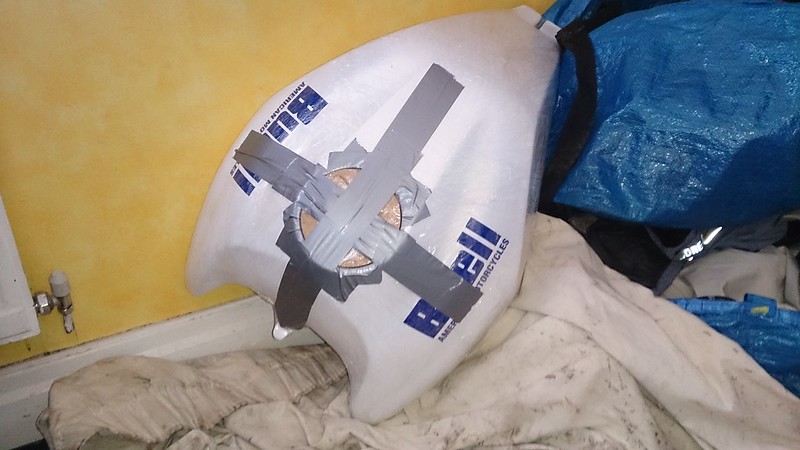
The outside of the tank was given a couple of layers of cling film before I started to protect the paint and practice what I plan to do for the epoxy.

It is possible to get a good look around quite a bit of the inside of the tank and the resulting 'key' looks like it should take the epoxy OK. A quick vac out of the resultant abrasive / plastic debris, then cleaning with some stardrops, warm water and then plenty of cold fresh water to rinse out and the tank is now waiting a few days to ensure it is thoroughly dry before the scary 'coating' bit.

Coating apparently is a couple of hours of a job to get a few layers onto the inside, looking to get into all areas. I will be knocking up a wooden 'cap' to bolt on to seal the top of the tank off to ensure I am able to get the inside of the painted top of the tank coated effectively. It is also something that needs to be done in the warm i.e. inside (haven't mentioned that to Julie yet lOl) in order to ensure that the resin flows effectively around the tank.

Obviously if I mess it up this will be my the last post on the subject!


Top
PostPosted: 16 Mar 2015 22:31 
Offline
User avatar

Joined: 07 May 2009 00:06
Posts: 2070
Current ride: S1W,S2T,1125CR
Location: North Bucks
Good luck, Jez :yup: If thoroughness is the key then you deserve to succeed. If not then at least Julie has good prospects as a vet lOl

Steve

_________________
Back on the road again!


Top
PostPosted: 16 Mar 2015 22:40 
Offline
Moderator
User avatar

Joined: 15 Apr 2009 17:25
Posts: 11771
Location: Oswestry
:yt:
How about throwing some old chainsaw chains in the tank? They should key up the plastic with a good rattle :?

_________________
If your dreams don't scare you, they are not big enough.


Top
PostPosted: 21 Mar 2015 12:51 
Offline
User avatar

Joined: 23 Jun 2009 12:55
Posts: 657
Current ride: S1W,Hype,HP2,R1200RS
Location: Preston, Lancs
Scary bit now done and it wasn't that bad even with a couple of mess ups.

The Flowliner has been in the house for a few days but it was still reasonably thick so it had an a few hours on radiator then in the airing cupboard to ensure it flowed:

Image
DSC_0527 by jeznewsome, on Flickr

Tank was covered in cling film, duck taped around the neck and a wooden plug made to try to ensure that the duck tape used to seal the neck remained stuck. The fuel pick up was taped off.

Image
DSC_0526 by jeznewsome, on Flickr

Then the stuff was mixed up for 5 mins as per the directions, carefully poured into the tank. I sealed the neck with duck tape then taped the plug in place.

With an hour on a timer I started slowly rotating the tank. There were some remnants of the epoxy in the can which I used to judge how it would flow inside the tank. It is not possible to hear or feel the epoxy in the tank. So I relied on being methodical and slow. After each rotation cycle (about 10 mins) it was left on an end to pool a little before getting another pass/coat.

Image
DSC_0528 by jeznewsome, on Flickr

After an hour I judged it had gelled enough to have a nosey inside. There was a little panic as the plug hadn't held the tape in place fully so some swift action was required to remove the area of tape and cling film from around the neck and clean up the area and filler threads of epoxy .... ironically with alcohol (IPA) which is the stuff I am trying to protect the tank from in the long term! This worked a treat.

Of the 625ml kit there was nothing to tip out (it is a large tank area) but over the next 45 mins or so I cleaned the area around the neck further and also the fuel pick up area. Every 10 mins or so I rotated the tank from end to end to ensure that there was no pooling, but as I said the process of coating had 'used' most of the liner put into the tank. There were a few 'drips' from the filler captive nuts that I removed during this time. There was no evidencce o any heat build up due to curing.

Once it had gelled more thoroughly a good look inside shows that it was all glossy and reasonably even coating on all visible surfaces. Now to leave it for at least a week to allow it to fully cure.

Time will tell whether it remains stuck on and protecting the tank once there is fuel inside, but I'll still be sticking to Esso Super when I can to give it the best chance.


Top
PostPosted: 15 Nov 2015 08:27 
Offline
proff. patpending
User avatar

Joined: 06 May 2009 20:20
Posts: 14705
Current ride: Victoria Sponge
Location: Bristol - Gateway to all things good
Probably early days Jez, but any news?

_________________
08 Specialized Langster


Top
PostPosted: 15 Nov 2015 09:22 
Offline
User avatar

Joined: 23 Jun 2009 12:55
Posts: 657
Current ride: S1W,Hype,HP2,R1200RS
Location: Preston, Lancs
I wish it was early days.........

Bike had been filled purely with Esso Super Unleaded (ok once a couple of litres of another super brand when I messed up), DaveH favourite brew and the one type that had the least chance of ethanol content....at least until next year when I believe legislation changes such that all fuels will have to have ethanol content.

However there are now some small bubbles under the decals. They don't seem to be getting worse but they are there......gutted.

Therefore pin pulled on a Holtworks tank, so, fingers crossed, hopefully that'll be painted up next winter


Top
PostPosted: 17 Nov 2015 19:51 
Offline
User avatar

Joined: 08 May 2009 19:54
Posts: 2467
Current ride: 1999 X1
Location: Texas, Gerrards Cross
Shame. Lots of hard work, time and money down the tubes. I guess plastic tanks are best left to dirt bikes.

_________________
Bob Krzeszkiewicz
2012 XR1200X - 2011 Kawasaki Z1000SX - 1999 Buell X1


Top
PostPosted: 17 Nov 2015 22:15 
Offline
User avatar

Joined: 06 May 2009 21:29
Posts: 1479
Shame that mate, I really hoped :idea: it would work :(

You'll need to do a bit of work fitting your holtworks tank, do that before you fit it :idea: I used some Yam tz rubbers on mine and its ok now.

Andy


Top
PostPosted: 18 Nov 2015 20:30 
Offline
User avatar

Joined: 23 Jun 2009 12:55
Posts: 657
Current ride: S1W,Hype,HP2,R1200RS
Location: Preston, Lancs
spondon440 wrote:
Shame that mate, I really hoped :idea: it would work :(

So did I!

Noted about the fitting. I will be taking care to get it fitting well before any painting......though I figure I have a reasonable amount of time before I need to worry too much about it.


Top
PostPosted: 19 Nov 2015 11:45 
Offline
User avatar

Joined: 10 Mar 2010 20:06
Posts: 976
Current ride: 2004 Buell XB 12s
Location: Schoorl ,Netherlands
spondon440 wrote:
: I used some Yam tz rubbers on mine and its ok now.

Andy


Like this?? http://www.meadspeed.com/products/yamah ... nk-rubbers

_________________
The sound of a V-twin engine braking is music to my ears!!


Top
PostPosted: 19 Nov 2015 12:14 
Offline
User avatar

Joined: 06 May 2009 21:29
Posts: 1479
Yes, and these http://www.ebay.co.uk/itm/kawasaki-h1-h ... xyyF5RQtiL


Top
PostPosted: 20 Nov 2015 16:09 
Offline

Joined: 01 Dec 2013 16:23
Posts: 3
Current ride: S1w lightning strike
Location: East sussex
Had the same problem even after having the buell decals airbrushed on.you will also need a Spondon ( top bloke) bespoke fuel filler retaining ring.as I had problems with fuel seepage around the fuel filler.


Top
Display posts from previous:  Sort by  
Post new topic  Reply to topic  [ 12 posts ] 

All times are UTC+01:00


Who is online

Users browsing this forum: No registered users and 4 guests


You cannot post new topics in this forum
You cannot reply to topics in this forum
You cannot edit your posts in this forum
You cannot delete your posts in this forum
You cannot post attachments in this forum

Search for:
Jump to:  
Powered by phpBB® Forum Software © phpBB Limited